Tips
Download and install One UI 4.0 (Android 12) fonts on your Samsung phone – Google Sans Font
Bringing the latest Android 12 along with One UI 4.0 has reached a huge number of Samsung fans. Absolutely, the One UI 4.0 version offers a huge package of new features and changes, making the whole mobile experience even more delightful.
Adding to this, to add more fun to Galaxy smartphones Samsung brings the Good Lock 2022. This app introduces several excellent services including modules and apps that make the One UI software system highly customizable.
Nevertheless, still, one thing that is missing out, that Samsung has not provided to is Galaxy users is an option for choosing Fonts. So, if you want to change your old or default Samsung font, you are at the right place. In this article, we’ll explain to you how to install Google Sans Font for Samsung Galaxy devices.
Interestingly, these fonts can be downloaded and installed on any Samsung Galaxy phone running One UI 4.0 to One UI 1.0. You can install any font using the .TTF file format. These include Google Sans, Roboto, Product Sans, Rubik and more.
Thanks to undertakings like Flipfont and zFont 3, it is now possible to install ay font or .TTF font on any Samsung device.
How to download font files in TTF format?
The FlipFont app will use introduces the installation of custom fonts using the .TTF extension. That is why it is important that you download fonts from the web only in .TTF format. You can also use stock fonts listed in the app, such as Samsung Sans or 1800+ stock flip fonts.
Here we have listed the most popular fonts in the Android community. One such font is Google Sans Font which is exclusive to Pixel smartphones.
Download the Font Installer app for Samsung One UI 4
There are two known font apps available for Samsung Galaxy devices that can install the latest One UI 4 update or compatible fonts on One UI 3 (Android 11), One UI 2 (Android 10) or OG One UI (including Android 9).
Download one of the following Font changer apps:
- zFont 3 APK from Play Store | Telegram Channel link | Source
- FlipFont APK from here (direct link) | Telegram Channel Link | Source
Install any font on the Samsung Galaxy phone using zFont 3
- Make sure your phone has a Samsung account signed in to back up the settings.
- Download and install the zFont 3 app from the top.
- Launch the ZFont 3 app.
- Go to the “Dashboard” tab.
- Select language.
- Search for any font like “Google Sans”.
- Select and Apply.
Follow the steps listed in the app. (Requirements)
- It prompts you to install the Samsung Sans font.
- Update the application.
- Apply Samsung Sans font from the phone settings.
Backup “Settings”. Just select “Settings”. - Uninstall Samsung Sans fonts.
Now, change the How-to section
- Select “Install Google Sans Fonts”
- Now, change the font to default.
- Select the Restore Data option and just tick Settings.
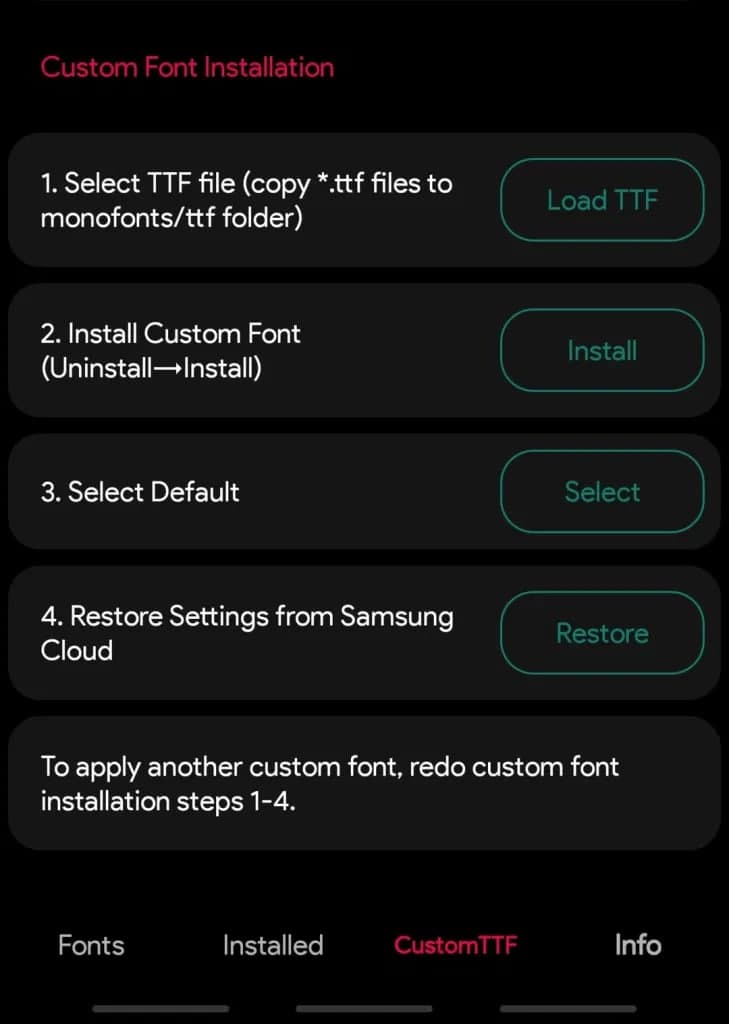
Alternatively, you can download the TTF font file and apply it using the last “Local” tab.
- “Select TTF File” from the Custom TTF section
- Tab “Load TTF”.
- Tab the Install Custom Font option.
- It is necessary to uninstall and install the Samsung Sans font.
- Restore settings from Samsung. Tick ”Settings only”.
- It must have a custom font installed on your device.

Install any font for Samsung Galaxy phone using Flipfont
- Download and install the FlipFont APK from here (direct link). OR from the downloads repository.
- Download any font from the download section above.
- Extract the zip file to get the .ttf font. Look for a simple font.
- Move the font file to the phone storage located at this location: monofonts/ttf
- If it does not exist, create a ttf folder.
- Launch the FlipFont app on your Samsung phone. It should be named #mono_
- Make sure your phone has a Samsung account signed in to back up the settings.
- Click on Install. Install Samsung Sans font.
- Click on the option. Select Samsung Sans font.
- Back up “Settings” to your Samsung cloud. Just tick “Settings”.
- “Select TTF File” from the Custom TTF section
- Click “Load TTF”.
- Click the Install Custom Font option.
- It is necessary to uninstall and install the Samsung Sans font.
- Restore settings from Samsung. Tick ”Settings only”.
- It must have a custom font installed on your device.
Note: For Backup & Restore, just go to Settings -> Accounts & Backup -> Backup & Restore -> Backup Data -> “Settings”.
Get notified –
Aside from SammyFans’ official Twitter and Facebook page, you can also join our Telegram channel, follow us on Instagram and subscribe to our YouTube channel to get notified of every latest development in Samsung and One UI ecosystem. Also, you can follow us on Google News for regular updates.
via – androidsage


Samsung Internet app is filled with a Secret Mode browsing feature. Under Samsung Internet, the company created a myriad of features all geared towards helping to keep you and your online experience safe.
Available for all Android phones, Samsung Internet brings user-centric security and privacy features to web browsing, enabling you to freely browse your favorite websites while helping to safeguard your privacy.
Samsung Internet also enables private environments with Secret Mode. This option offers the same browsing experience as you would normally experience on Samsung Internet but with extra privacy and protection.
Secret Mode won’t let cookies and browsing history for any websites you visit be stored on your phone. As soon as you close all the tabs from Secret Mode, cookies and browsing history will be erased, leaving no clue of what happened.
To use this feature, go to Samsung Internet, and from the main screen, tap on the Tab Manager icon on the bottom where you can manage your open pages. Activate Secret Mode by tapping “Turn on Secret mode”.

Privacy Dashboard:
Available within the Quick Access page, the Privacy Dashboard offers a detailed record of weekly activities and settings that can be adjusted to suit your privacy preferences. To find this, go to the browser, tap the three lines icon, and select Privacy.

Are you using a Samsung Galaxy smartphone running on One UI 6.1 and having trouble finding the video call effects option? Let us tell you that Samsung has updated this feature to make it easier for you to customize your video calls. Here’s what’s new and how you can set it up.
With the One UI 6.1 update, Samsung has moved the video call effects feature settings to the Quick Panel. Now, you can access and change video call effects without having to navigate through multiple screens. When you pull down from the top of your screen, the Quick Panel appears.
Here’s how to set up Video Call Effects:
You can easily use the Video Call effects on your Samsung devices, just need to follow a few steps:
- Start a video call using any app that supports video calling. Make sure you’re in the middle of the call before you try to change the effects.
- While you’re on the video call, pull down from the top of your screen to open the Quick Panel. Pull down again to reveal more options.
- In the Quick Panel, find the Video Call Effects button. Tap on this button to open the settings for video call effects.
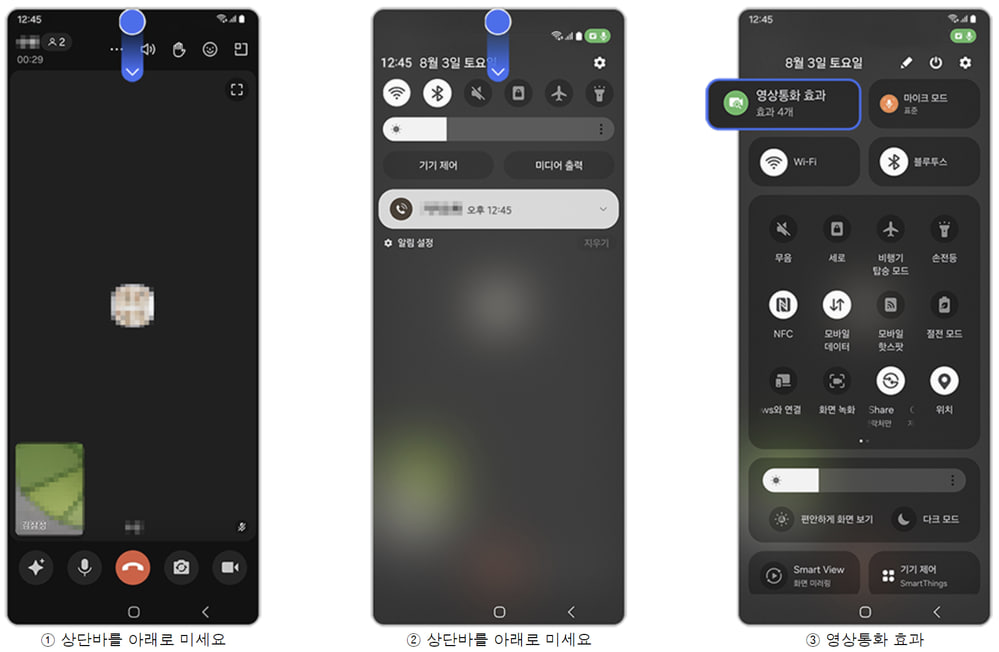
- You’ll now see several options to customize your video call. You can change the background, adjust your face effects, modify the color tone, or use automatic framing. Select the options that you like to enhance your video call.

Users with Samsung devices running from One UI 3.1 to One UI 6.0 have to select the video call effects icon directly on the call screen. But with One UI 6.1, accessing these features through the Quick Panel is now simpler.
If you haven’t used these effects on your Galaxy devices yet, try it now to make your video calls fun and engaging.
How to create 24 hour time-lapse video from single photo on Samsung devices

Samsung offers a range of advanced Gallery and Camera features for Galaxy devices that let you capture and edit images and videos like a professional. One of the amazing features of Samsung devices is the ability to convert a single photo into a 24-hour time-lapse video.
If you’ve ever wanted to see a single photo transform into a stunning time-lapse that captures a full day, this Gallery feature is perfect for you. It can take photos of landscapes, skies, sunsets, and more, and turn them into stunning videos that show the changes from morning to night, all 24 hours.
The 24-hour time-lapse video feature of the Samsung automatically detects if your photo includes elements like the sky or sunset. If it does, the AI on your Samsung device can convert it into a time-lapse video. It provides a unique way to experience how a scene transforms throughout the day, all just by one photo.

How to transform a single photo into a 24-hour time-lapse video
To create a beautiful time-lapse video from a single photo, you just need to follow a few simple steps:
- Open the Gallery app on your Samsung device. Look for photos with landscapes, skies, or sunsets.
- Choose the photo you want to convert.
- Tap the info menu at the bottom of the screen.
- If the photo has a recognizable sky, the 24-hour time-lapse option will appear. Tap it to generate the video.
- After the video is created, you can save it to your Gallery or share it with others.

One UI 6.1.1’s Motion Clipper feature coming to these Samsung devices